#

Sunday, September 18, 2016

I am going to install CCP version 2.7 in a Windows 10 machine which has Internet Explorer v11.
(click on the image for full view)

Log in to Cisco.com and download CCP from here

Run the app as Administrator to install it but do not run it just after install.

Now go to Windows search bar and type Configure Java and open the app.

Go to Security > Edit Site List and Add http://127.0.0.1:8600 and hit OK.


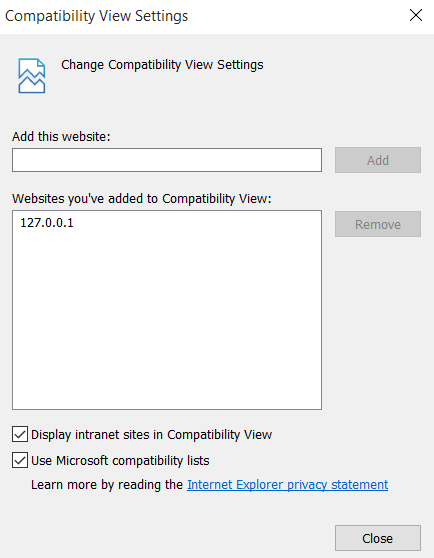
In Internet Explorer, go to Tools > Compatibility View Settings and Add http://127.0.0.1 and hit Close.

Now run CCP desktop shortcut as Administrator and it will be working fine for most PCs if your Java & Flash is up to date.


If not working well, Following steps will also be needed..

Update Java to the latest version from Java.com

Check Adobe Flash Player works for Internet Explorer or update it. You can check it here

Monday, September 12, 2016

Boot the router and interrupt the boot sequence as soon as text appears on the screen.
Press Ctrl + Break for SecureCRT in Windows.
It will go to rommon mode
rommon 1>

Change the configuration register to ignore the contents of NVRAM
rommon 1>confreg 0x2142

Reboot the router
rommon 2>reset

Router will boot as a new router. After booted, you can either delete startup config file in NVRAM or copy startup-config to running-config and change password.

Finally change change the configuration register back to its default value before reboot.
Router(config)#config-register 0x2102

Wednesday, September 7, 2016

This post is just a summary note about making a basic call using 2 IP phones with a single CUCM.

After installing CUCM and configuring routing and switching parts, I started doing it through following steps.
Devices used are a CUCM, a 3900 series Router, a 2960 POE switch and 2 Cisco 7945 IP phones

No detailed overview, just required steps are mentioned in an order.

01. Activate Services & Features in Cisco Unified Serviceability Interface
      Go to Tools > Service Activation
      Mandatory Services to activate include Cisco CallManager, Cisco TFTP, Cisco CTIManager,               Cisco WebDialer Web Service etc

From here onwards, you will configure the following under Cisco Unified CM Administration Interface

02. Create Application Users
      Go to User Management > Application User 

03. Change CUCM name to IP address for DNS independence
      Go to System > Server
      Go to System > Enterprise Parameters & change the Phone URL parameters too

04. Configure a Unified CM Group
      Go to System > Cisco Unified CM Group

05. Configure a phone NTP reference
      Go to System > Phone NTP Reference

06. Configure a Date/Time group
      Go to System > Date/Time Group

07. Configure a Region
      Go to System > Region
      In the Modify Relationships to Other Regions section, define the codec that will be used

08. Configure Locations
      Go to System > Locations

09. Configure Device Pools
      Go to System > Device Pool

10. Create a Phone Button Template
      Go to Device > Device Settings > Phone Button Template

11. Create a Softkey Template
      Go to Device > Device Settings > Softkey Template

12. Create a Common Phone Profile
      Go to Device > Device Settings > Common Phone Profile

13. Configure Partitions
      Go to Call Routing > Class of Control > Partiotion

14. Configure a CSS
      Go to Call Routing > Class of Control > Calling Search Space

15. Configure a H.323 Gateway or SIP Trunk
      Go to Device > Gateway / Trunk

16. Configure a Route Group
       Go to Call Routing > Route/Hunt > Route Group

17. Configure a Route List
      Go to Call Routing > Route/Hunt > Route List

18. Configure a Route Pattern
      Go to Call Routing > Route/Hunt > Route Pattern

19. Add Users via LDAP Synchronization
      Cisco DirSync Service must be enabled first
      Go to System > LDAP > LDAP System
      Go to System > LDAP > LDAP Directory

20. Create an End User
      Go to User Management > End User

21. Configure LDAP Authentication for End Users
      Go to System > LDAP > LDAP Authentication

22. Add an IP phone Manually
      Go to Device > Phone
      Add a DN on the phone line

23. Add phones using Auto Registration
      Go to System > Cisco Unified CM
      Click on a CUCM and go inside an enter Starting & Ending Directory Numbers

24.  Adding End Users and Phones with the BAT
       Cisco Bulk  Provisioning Service must be enabled first
       Go to Bulk Administration > Upload/Download Files